
Monday, December 27, 2010
Saturday, December 4, 2010
*Tutorial* Make your own Chinese Takeout Gift box!

Check out all of the fabulous holiday-themed projects, gift ideas, and more from our wonderful EtsyMom Blog Hop Contributors from around the world!!
www.signature-sterling.blogspot.com/
www.allyouneeddesigns.blogspot.com/
www.tctliebel.typepad.com
http://rikrakstudio.blogspot.com
www.singingthreelittlebirds.blogspot.com/
http://camelotstreasures.blogspot.com
www.homemadebyamanda.blogspot.com/
www.annavirginiafashion.blogspot.com/
www.mylavenderave.blogspot.com/
www.babyjives.blogspot.com
www.babyswank.blogspot.com/
www.babysindulgencebyjocelyn.blogspot.com/
www.handmadewhimzy.blogspot.com/
www.katekatenyc.blogspot.com
www.caramagic.blogspot.com/
www.onlyterrastreasures.blogspot.com/
www.silverrosedesigns.blogspot.com
www.quirefly.blogspot.com
www.cinnamonspicecrafts.blogspot.com/
www.handprintlady.blogspot.com
www.onlyterrastreasures.blogspot.com/
www.silverrosedesigns.blogspot.com
www.quirefly.blogspot.com
www.cinnamonspicecrafts.blogspot.com/
www.handprintlady.blogspot.com
Here's how it works:
1. Hop through each of the blogs listed above to get fabulous holiday inspiration and leave a comment. If you are starting at a blog in the middle of the Hop, start back at the EtsyMom Blog. You may have to scroll down a bit on the blogs to find the Blog Hop posts as the week progresses.
2. Leave a comment on the EtsyMom Blog post between now and December 11, 2010.
3. Enter to win our giveaway by doing any of the following. For each thing you do, you will be entered into the drawing one more time:
~Leave a comment on the EtsyMom Blog post between now and December 11, 2010.
~Leave a comment on the Holly Day Blog Hop posts for any of the blogs listed above between Dec 5 and Dec 11, 2010.
~Join the EtsyMom Blog email list (fill out the form in the right hand column).
~Become a follower of the EtsyMom Blog! Just click the "Follow" button in the lower right column.
~"Like" the EtsyMom Facebook Page.
Share about this Blog Hop on your own blog, posting a link to this page.
Share about this Blog Hop on Facebook, posting a link to this page.
Share about this Blog Hop on a message board or forum, posting a link to this page.
To let us know you've done these things, please come back to the EtsyMom Blog post and leave a comment for each thing you did.
Sorry - you cannot enter the giveaway here on my blog.
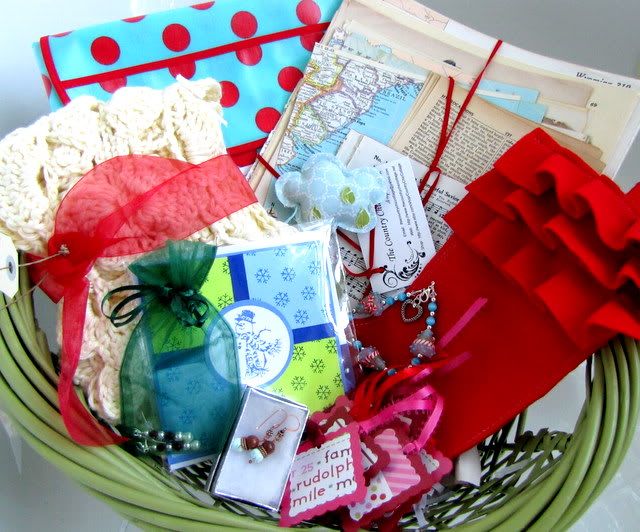
On December 11, 2010 we'll choose a winner using the Random Integer Generator from random.org. The winner will receive this super sweet gift basket full of handmade holiday goodies, including:
Sorry - you cannot enter the giveaway here on my blog.
On December 11, 2010 we'll choose a winner using the Random Integer Generator from random.org. The winner will receive this super sweet gift basket full of handmade holiday goodies, including:
a pair of Turquoise Earrings from
http://www.stoneymistdesign.etsy.com/
http://www.stoneymistdesign.etsy.com/
a greeting card from
http://www.homemadebyamanda.etsy.com/
http://www.homemadebyamanda.etsy.com/
a lampwork bead bracelet by
http://handmadewhimzy.etsy.com/
http://handmadewhimzy.etsy.com/
sterling silver and Swarovski pearl/crystal holiday earrings by
a cream colored cotton scarf given by
http://www.zoegirldesigns.etsy.com/
http://www.zoegirldesigns.etsy.com/
a raincloud ornament from
http://www.etsy.com/shop/babyjives
http://www.etsy.com/shop/babyjives
a matching splat mat and baby bib from
http://www.babysindulgence.etsy.com/
http://www.babysindulgence.etsy.com/
two pair of earrings from
http://quirefly.etsy.com/
a gift pack of over 30 pages of vintage paper ephemera by
http://www.etsy.com/shop/countrychiccottage
http://quirefly.etsy.com/
a gift pack of over 30 pages of vintage paper ephemera by
http://www.etsy.com/shop/countrychiccottage
a lovely sustainable stocking from
http://www.rikrak.etsy.com/
http://www.rikrak.etsy.com/
a set of holly jolly gift tags from
http://cinnamonspice.etsy.com/
http://cinnamonspice.etsy.com/
a set of toddler pajamas in a style of the winner's choice from
http://heatheregley.etsy.com/
http://heatheregley.etsy.com/
a $15 gift certificate from
http://camelotstreasures.etsy.com/
http://camelotstreasures.etsy.com/
A gift certificate from
http://babyswank.etsy.com/
A Custom copper heart necklace from
http://www.etsy.com/shop/ct2designs
http://babyswank.etsy.com/
A Custom copper heart necklace from
http://www.etsy.com/shop/ct2designs
Chinese Takeout Gift box:
I absolutely love these little containers for small gifts. You can make them any color you want and decorate them like crazy! I didn't do very much with this one but the possibilities are endless.

You will need:
1 poster board
bone folder
glue
ribbon
hole punch
anything else you'd like to use to decorate it with
pattern (click to download)
Print and assemble pattern template. One of the pages you'll need two copies of because both sides of the box are identical. Place template on poster board, anchor with weights and trace around it. I used brown paper for my template and testors model paint for weights. (At least they're being used for something).

Your template should look something like this with four sides joined to the box in the center.

With careful precision cut out gift box. And now you'll have this:

Here's where the fun begins. Using a bone folder (or anything you can get your hands on. I used a ruler and a flat head screw driver) create perfect creases in the areas marked with dotted lines. This really makes a difference giving your box crisp clean lines.

Using your hole punch, place strap holes in the center of the side pieces. Don't try to do this part later you'll hate yourself (Trust me I know). Now fold your box together and glue sides. I kept the flaps on the outside because it appeared more authentic to me, but its your preference. Place ribbon through the hole you punched on each side and knot. Now its time to decorate. Have fun!

Etsy Mom Holly Day Blog Hop - Huge Giveaway
 Just a couple of days away from our Holly Day Blog Hop! Beginning Sunday, you'll have a chance to visit several of our EtsyMom blogs to find out what they are cooking up for the holidays, from yummy recipes to fun tutorials, you won't want to miss this! And we know you all love some handmade goodness, so one lucky winner will receive a gift basket stuffed with everything from hand crafted jewelry, paper goods, vintage ephemera, baby gear, holiday decor and more! See you here on Sunday!
Sunday, November 21, 2010
Awesome Giveaway!

Bellasymphony has an awesome giveaway going on this week on her blog. She has a fantastic Esty shop full of some of the cutest stuff. It is definitely a favorite of mine and I would love to have some stuff from there. So Go Check It Out! :)
Friday, November 5, 2010
Rocky and Bullwinkle
So my lovely husband decides that our children would look adorable as Rocky and Bullwinkle for Halloween.

I just laughed and then proceeded to spend hours scouring the internet for costumes. What do you know, no costumes. So now I realize I'm going to have to make them. Ugh. After much trial and error, I finally have a working pattern for the moose head.

A few tips on when you make your own pattern. Always be sure to try the pattern out with scrap fabric first just to make sure you have all the kinks worked out.

Don't you just love my moose head in progress?

For the squirrel head I was lucky enough to find a dog costume that I could redo. Not that the body would work, but I was able to redesign the head so I didn't have to make the entire thing from scratch. Here's the squirrel costume I found.
As for the bodies I wanted to take the easy route, I used a McCalls dragon costume pattern. I didn't need to use the tail, spikes or claws and on the squirrel I redesigned the feet so they would be smaller. Overall I wasn't very happy with the pattern because I felt it ran much larger in size. I ended up having to take both costumes in and I still felt they were too large.
 (Cutting the fur fabric turned out to be very messy and a bit of a pain. I would definitely recommend using sharp scissors to cut it.)
While I was looking around Etsy one day I ran across a shop that had the perfect eyes for this project. I was actually cutting it really close by ordering a week before Halloween but the seller was amazing and shipped them out to me the same day I ordered.

So in the end they did at least come out looking like a moose and a squirrel. *Note to self* Take pictures at the beginning of the night when they're still happy rather than the end.

They were so ready for bed.

I just laughed and then proceeded to spend hours scouring the internet for costumes. What do you know, no costumes. So now I realize I'm going to have to make them. Ugh. After much trial and error, I finally have a working pattern for the moose head.

A few tips on when you make your own pattern. Always be sure to try the pattern out with scrap fabric first just to make sure you have all the kinks worked out.

Don't you just love my moose head in progress?

For the squirrel head I was lucky enough to find a dog costume that I could redo. Not that the body would work, but I was able to redesign the head so I didn't have to make the entire thing from scratch. Here's the squirrel costume I found.
As for the bodies I wanted to take the easy route, I used a McCalls dragon costume pattern. I didn't need to use the tail, spikes or claws and on the squirrel I redesigned the feet so they would be smaller. Overall I wasn't very happy with the pattern because I felt it ran much larger in size. I ended up having to take both costumes in and I still felt they were too large.

While I was looking around Etsy one day I ran across a shop that had the perfect eyes for this project. I was actually cutting it really close by ordering a week before Halloween but the seller was amazing and shipped them out to me the same day I ordered.

So in the end they did at least come out looking like a moose and a squirrel. *Note to self* Take pictures at the beginning of the night when they're still happy rather than the end.

They were so ready for bed.

Thursday, November 4, 2010
Welcome to Terra's Treasures!
Hi and hello to anyone who might end up reading this. My hopes in creating this blog is to connect with the many passionate and curiously creative people among us. I hope to share with you techniques, ideas and anything that might spark your own ideas. In return I hope you also share your ideas and any feedback that you might have. I always value the opinion of others. So here's to us!
Subscribe to:
Posts (Atom)